| KLM 747-400 Maiden Flight | 2. Programming the FMC |
Setting geo position
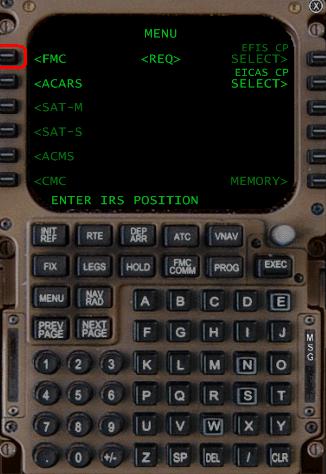 |
The Flight Management Computer (FMC) has become an indispensable part of modern aviation and fulfils (among others) the following tasks: - Continuous calculation of optimal route, control, consumption - Monitoring all on-board systems - Operation within the safe limits of the aircraft, aerodynamics, mechanics and regulations - Flying with maximum efficiency - Automatic control of systems such as the Autopilot for vertical/horizontal navigation, speed and Autoland The FMC can fly the aircraft more safely and efficiently than a pilot and takes a lot of work off the pilot's hands during critical and busy phases of the flight. We program the FMC almost completely before departure and many things can no longer be set during the flight: Then you will have to continue to do everything yourself for the remainder of the flight. This programming is done by means of one of the three Control Display Units (CDU). We call up the CDU with the FMC button on the 'Panel switcher' or with Ctrl+Shift+F. The first step is setting the position. A commercial aircraft is not solely dependent on GPS and therefore has a (3-fold) Inertial Reference System (IRS) to determine the position completely autonomously. The GPS can be used for initialization and calibration of the IRS during the flight. To the left and right of the CDU screen are buttons that perform function shown next to them on the screen. We call the buttons on the left L1 to L6 and on the right R1 to R6 So to enter FMC mode we press L1.
| |||
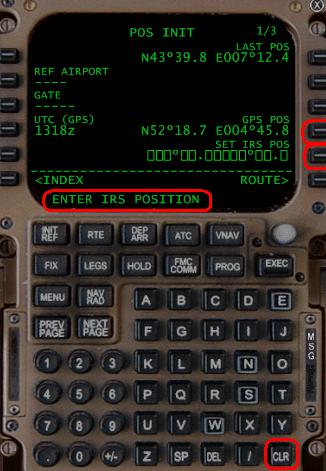 |
On the overhead panel we have just set the three IRS systems to NAV and after a while they are finished initializing and they need the exact current position. We also see this as a message on the bottom line of the CDU: 'ENTER IRS POSITION'. This must be entered at R5. Blocks always mean that you have to enter something there, dashes that it is possible (e.g. at L2 and L3) At R4 is the current GPS position. We want to copy this to R5. Before we can edit, we need to clear the message on the bottom line which is also our input line. This can be done with the CLR button at the bottom right. Now that the message line is empty, we can type something there or copy it from another field. We copy the GPS value to the message line with R4. Then we copy the value of the message line to the IRS position with R5.
|
Route programming
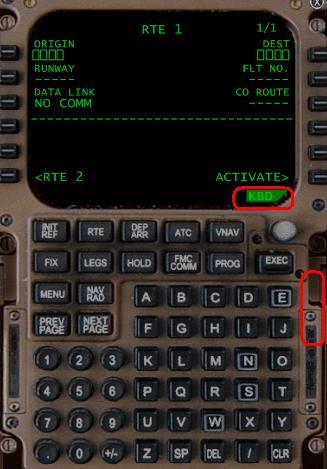 |
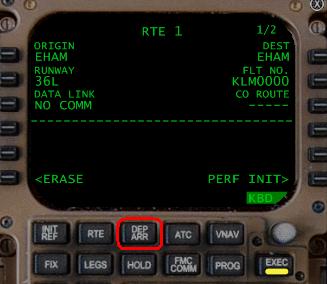
We now come to the RTE1 screen to enter route 1. There is a possibility to enter an alternative with RTE2, but we do not use that now. On this screen we have to enter (blocks) departure (L1) and arrival (R1) and we can enter (dashes) the runway (L2) and flight number (R2) or a saved route (R3). For example, to type EHAM (code for Schiphol Amsterdam) we can press the buttons of the CDU with the mouse. However, for typing it is easier to temporarily connect the keyboard of your computer to the CDU. Do not forget to switch this off afterwards because as long as it is on you cannot give any other commands to the flight simulator with the keyboard! You can switch it on and off by clicking on the indicated part on the right side of the CDU keyboard (mouse arrow changes) or by using Shift+K. The indication 'KBD' will appear at the bottom right of the CDU screen.
| |||
   |
|
Performance and take-off data
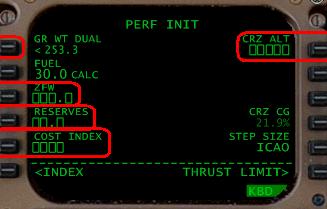 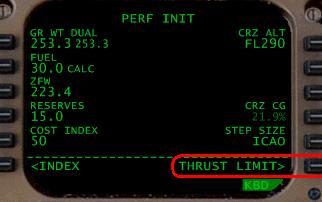 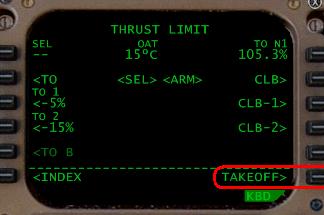 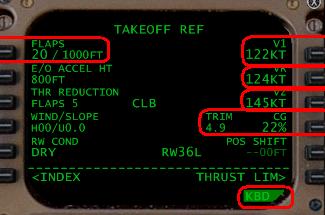 |
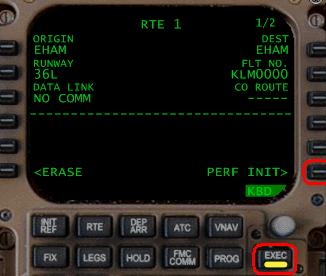
On the PERF INIT screen we see our current weight at L1. Press L1 to confirm. The <-sign for the weight then disappears. At L2 we see the current amount of fuel. This is also always at the bottom right of the EICAS screen (bottom right on the main cockpit). At L3 the weight excluding fuel has now been calculated. At L4 we have to fill in the reserve fuel supply. Enter 15 here. The FMC now checks during the flight whether there is always 15,000kg of fuel reserve left. At L5 we have to fill in the COST INDEX, a number that indicates how economic we have to fly. Set this to 50. At R1 we have to fill in what our (initial) cruising altitude will be. Set this to FL290. Now go to THRUST LIMIT with R6. On the TRUST LIMIT screen we can indicate whether we want to limit the power at take-off. We can also enter a different temperature at L1 if we expect it to be different at take-off (if we are now inside a hangar, for example). We do not change anything here and go to the TAKEOFF screen with R6. On the TAKEOFF REF screen we enter at L1 that we are going to take off with flaps 20. At L5 we can indicate whether the runway is DRY or WET (impacts braking distance at V1). With R1, R2, R3 and R4 we confirm the speed calculated by the FMC at V1, VR and V2 and the centre of gravity with associated trim. Do not forget to disconnect the keyboard from the CDU by clicking on the strip to the right of the keyboard or with Shift+K. Let's now copy some things to the main panel: |
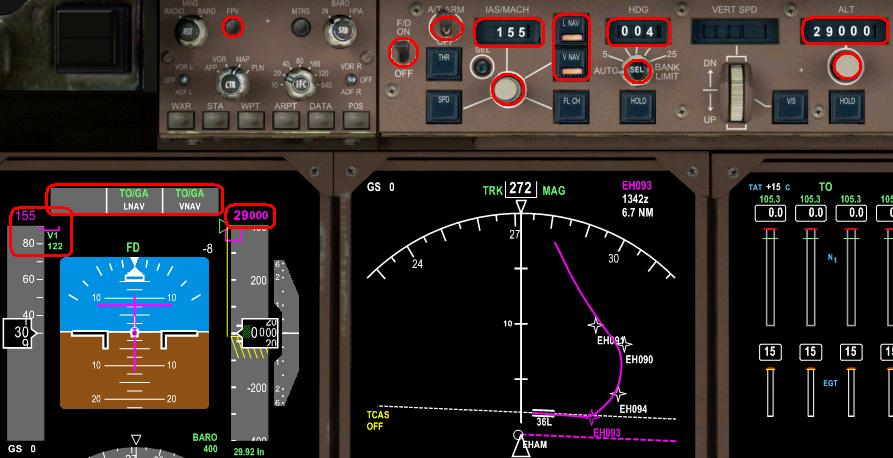 |
Along the top edge of the dashboard is the Mode Control Panel (MCP) which operates the Autopilot (AP).
- Press the FPV (Flight Path Vector) at the top left for a dot that shows the actual flight direction in the artificial horizon on the Primary Flight Display (PFD). - Turn the Flight Director (F/D) ON which shows the purple lines in the PFD that indicate where the center of the artificial horizon should be. FD is now displayed above the artificial horizon. - Turn the Auto Throttle (A/T) ON, to allow the autopilot to control the throttle. - Set the IAS/MACH to the value of V2+10 (see CDU), as the speed to be maintained during take-off. This value is now also displayed in purple above the speed strip on the PFD. - Turn on the LNAV and VNAV to allow the FMC to control the lateral and vertical flight path via the Autopilot. We also see this at the top of the PFD; first TO/GA mode, then LNAV and VNAV. - Set the heading (HDG) to the heading of the runway (just to check later whether we are on the right runway; because LNAV is on, this value will not do anything). - Set the cruise altitude at ALT to 29000. On the one hand as a reminder, on the other hand to never let the FMC go above this altitude. In VNAV mode, this is the maximum altitude limit when ascending and the minimum altitude limit when descending. We see this value in purple above the altitude strip on the PFD on the right. |
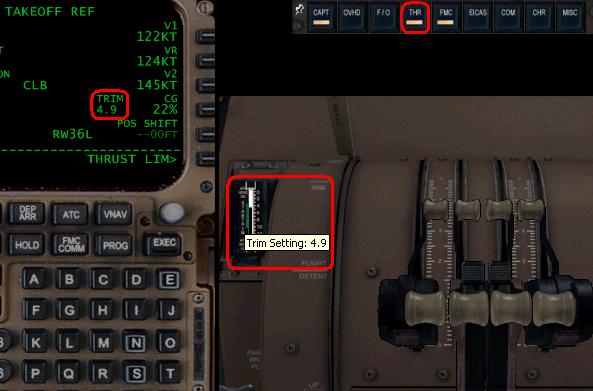 |
Now we still have to set the altitude trim to the value as shown on the CDU. For this we have to go to the Throttle panel with THR on the 'Panel switcher' or with Ctr+Shift+T. The easiest thing to do now is to position the mouse on the trim band so that we can see the value and then set the trim with 'Home' and 'End'. (Is the keyboard of the CDU turned off?). This completes the entire flight preparation for take off. |
Save as Flight |
|
This is a good moment to save the current setup/situation as Default Flight. Then you don't need to do all of this setup again next time. In the menu go to 'File'>'Save Flight...' and call it for example 'KLM 747-400 at EHAM gate F4 Programmed' ATTENTION: Check if all switches are in the correct positions. Sometimes these are not saved correctly! Especially MCP and lighting switches go wrong sometimes. |
| < Contents | Pushback and Startup > |