| KLM 747-400 Maiden Flight | 1. Turning on base systems |
The 'Overhead Panel' |
 |
Above our head is the 'overhead panel'. In the virtual cockpit we can also see that: Press 'S' and watch the virtual cockpit with 'Ctrl' or 'Ctrl+Shift' or 'Shift' in combination with 'Backspace' and 'Enter' By pressing 'S' again, we switch to 'tower view', and 'S' again to 'spot plane view'. After one more 'S' we are back again on the regular view. We can show the overhead panel with the 'Panel switcher' 'OVHD'-button or with 'Ctrl+Shift+O' The overhead panel will be run through in 3 columns from left to right and top to bottom: The left column controls electrical power and below that the hydraulics; The middle column controls safety, engine start, fuel and anti-ice/window heaters; The right column handles all 'air'-systems: oxygen, pneumatics, airco, etc. Below these columns is a row with switches to control lighting. Let's work our way throught this panel. |
Electrical power (left column)
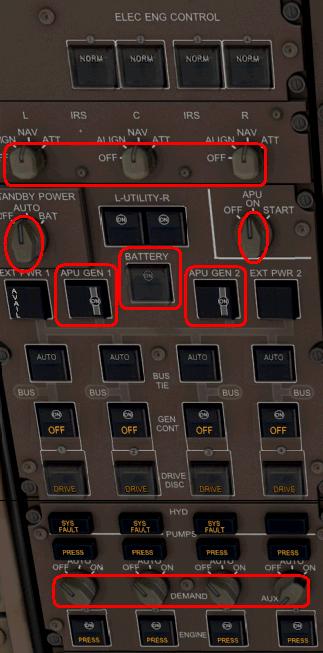 |
When finished we want this column to look like this: The first step is turning on the main power switch 'BATTERY'. The cover flap can be opened and closed with the right mouse button, the button can be turned on or off with the left mouse button. When switching on, the flap automatically closes. Diagonally above and to the left is the 'STANDBY POWER' rotary switch, which we set to 'AUTO' (mouse on switch edge and then turn right with right mouseclick and left with left mouseclick). We're now running on internal battery which is not big enough to run for long, so let's start the generators quickly: the APU's: Turn the APU switch with right mouseclick to 'START'. The switch will bounce back to 'ON'. Now wait for a minute or so till they're started ... When the APU GEN 1 and 2 buttons light up (AVAIL), we can activate them by clicking on them; one at a time, wait for ON to light up! We now run on electrical power coming from the generators. Now check from top to bottom if all buttons are as shown here. A white lamp on a button means 'ok', white and orange means 'armed' or will be ok, and orange only means 'wrong', but no problem as long as we're not airborne. So at this moment, the hydraulics have no pressure yet because the engines are not yet running. The four switches at the bottom are for the hydrolic demand pumps en should stay off for now because otherwise flaps outside could move and injure ground personnel. The fourth is already set to AUX so that braking power will be available later during pushback. Now we are going to set the three IRS switches at the top to NAV. This has to be done via OFF if they are not already there. The Inertial Reference System (IRS) normally takes 10 minutes to initialize (we have set it to 15 seconds in the settings). Now the left column should be the same as shown and we only need to set the correct lighting. | |
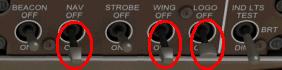 |
At the bottom right we find the panel above: - BEACON (red flashing light on top and bottom of the body) has to be turned on as soon as we leave the gate until we are parked again. - NAV (red/green/white on the ends) is on as soon as we are powered => Turn it ON now - STROBE (white flash) has to be on on the runway (also when crossing) and in the air. - WING illuminates the wings for better visibility and control of e.g. ice formation => Turn ON - LOGO illuminates the fin of the tail for better visibility => Turn ON |
Engines/fuel (middle column)
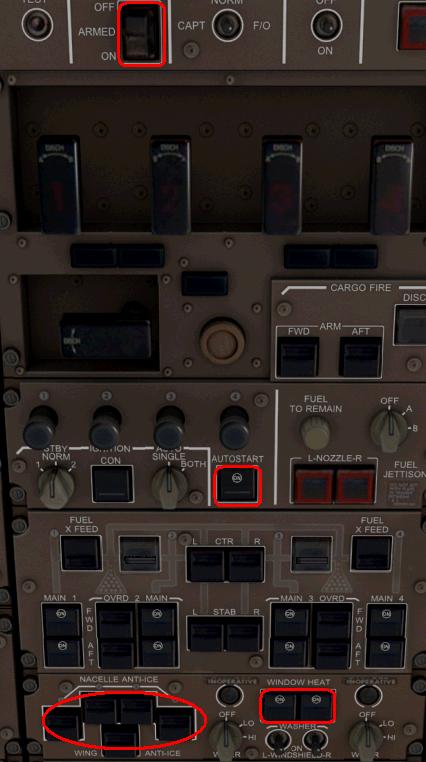 |
This column should also look as shown here: In the top row, use the right mouse button to close the flap over the emergency lights to arm them. You can press and hold the test button of the fire alarm on the left until the alarm has gone off 3 times. Below that we find the handles of the engine fire extinguishing system, which are already set correctly. Below that we find the engine start section with the four pull-out buttons, check that AUTOSTART is on. Next to it is the panel to dump fuel during the flight. Of course, we only do that in emergencies because we have calculated exactly how much fuel we need to take in and we have to work very cost-efficient. The panel below that operates the fuel system, which is one of the most advanced of its kind. When we set the fuel in the menu (e.g. 30,000 kg), the switches for the pumps were automatically set correctly. With the EICAS screen (EICAS on 'Panel switcher' or Ctrl+Shift+E) and then the extra control panel in the middle right, choose the 'FUEL' info, we get to see the current situation. Also check this regularly during the flight. The lower part contains the buttons for the Anti-Ice heating of the engines (nacelle) and a button for the wing heating on the left. You turn this on when it is below 10 degrees celcius and high humidity To the right of it are the settings for windscreen wipers, windscreen heating, blowers etc. The windscreen heating (2x) must always be on otherwise the glass will crack! Now the middle column should be the same as shown here and we can continue with the right column. |
Pneumatic (Air) systems (right column)
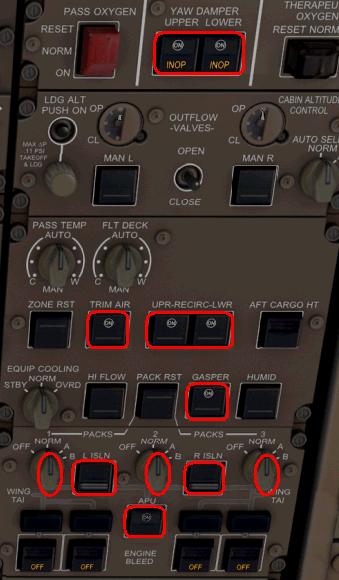 |
This column should be configured as shown here, but you set it from bottom to top: Turn on the APU BLEED button at the bottom to provide the PACKS with intake air. The PACKS are 3 air conditioners/compressors that are each also doubled: The pressure system is even more critical for safety than the engines! Above the APU BLEED button, turn the three rotary switches of the PACKS to the NORM position. Then turn on the left and right isolation (ISLN) switches. Unfortunately, they do not have a light and it is difficult to see. If necessary, use EICAS (Ctrl+Shift+E) ECS to see if the packs are connected. Above that are the buttons to set the air circulation: - Turn on GASPER; these are the air blowers that are located above each passenger seat. - Turn on UPR-RECIRC-LWR: these are for circulation from under the floor and above the ceiling. - Turn on TRIM AIR: mix cooled air with heated air from APU/engines. Check at the top whether the UPPER and LOWER YAW DAMPERS are on, these are for longitudinal stabilization of the flight. With those last steps we have completed the overhead panel. |
Communication Panel
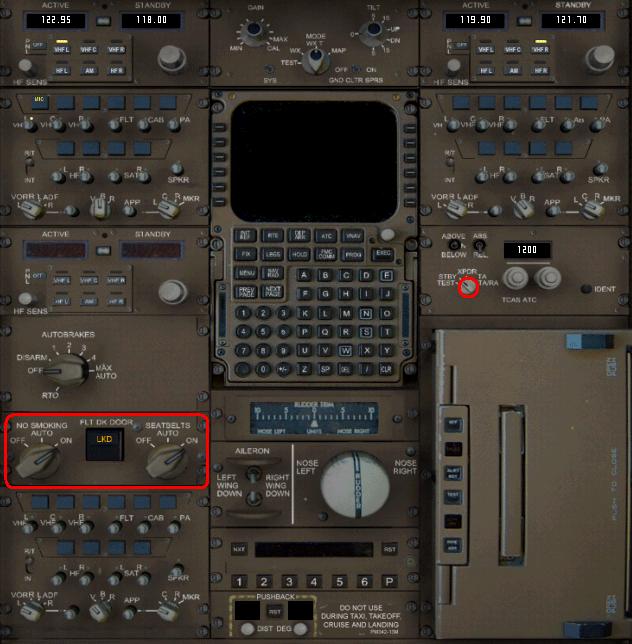 |
The Communication Panel is located on the center console between captain and copilot. We can use the 'Panel switcher' 'COM' button or 'Ctrl+Shift+C' to go to the communication panel as shown here Most of it is for setting the radios, but we will not be using them on this flight. Despite the fact that you can do a lot here, for now we only need to set two things: Set the switches for SEATBELTS and NO SMOKING to ON in the middle left and turn on the button in between to lock the door to the cockpit. Furthermore, we need to set the TRANSPONDER to STBY (Standby) in the middle right. With this we have also 'completed' the communication panel and all on-board systems are ready for use. In the next part we will discuss programming the Flight Management Computer (FMC). |
Save as Flight |
|
This is a good moment to save the current setup/situation as Default Flight. Then you don't need to do all of this setup again next time. In the menu go to 'File'>'Save Flight...' and call it for example 'KLM 747-400 at EHAM gate F4 Powered' ATTENTION: Check if all switches are in the correct positions. Sometimes these are not saved correctly! Especially MCP and lighting switches go wrong sometimes. |
| < Contents | Programming the FMC > |